Hosting a Prefect server instance
After you install Prefect you have a Python SDK client that can communicate with Prefect Cloud, the platform hosted by Prefect. You also have an API server instance backed by a database and a UI.
In this section you'll learn how to host your own Prefect server instance. If you would like to host a Prefect server instance on Kubernetes, check out the prefect-server Helm chart.
Spin up a local Prefect server UI by running the prefect server start CLI command in the terminal:
prefect server start
Open the URL for the Prefect server UI (http://127.0.0.1:4200 by default) in a browser.
Shut down the Prefect server with
Differences between a self-hosted Prefect server instance and Prefect Cloud
A self-hosted Prefect server instance and Prefect Cloud share a common set of features. Prefect Cloud includes the following additional features:
- Workspaces — isolated environments to organize your flows, deployments, and flow runs.
- Automations — configure triggers, actions, and notifications in response to real-time monitoring events.
- Email notifications — send email alerts from Prefect's servers based on automation triggers.
- Service accounts — configure API access for running workers or executing flow runs on remote infrastructure.
- Custom role-based access controls (RBAC) — assign users granular permissions to perform activities within an account or workspace.
- Single Sign-on (SSO) — authentication using your identity provider.
- Audit Log — a record of user activities to monitor security and compliance.
You can read more about Prefect Cloud in the Cloud section.
Configuring a Prefect server instance
Go to your terminal session and run this command to set the API URL to point to a Prefect server instance:
prefect config set PREFECT_API_URL="http://127.0.0.1:4200/api"
PREFECT_API_URL required when running Prefect inside a container
You must set the API server address to use Prefect within a container, such as a Docker container.
You can save the API server address in a Prefect profile. Whenever that profile is active, the API endpoint will be be at that address.
See Profiles & Configuration for more information on profiles and configurable Prefect settings.
Prefect database
The Prefect database persists data to track the state of your flow runs and related Prefect concepts, including:
- Flow run and task run state
- Run history
- Logs
- Deployments
- Flow and task run concurrency limits
- Storage blocks for flow and task results
- Variables
- Artifacts
- Work pool status
Currently Prefect supports the following databases:
- SQLite: The default in Prefect, and our recommendation for lightweight, single-server deployments. SQLite requires essentially no setup.
- PostgreSQL: Best for connecting to external databases, but does require additional setup (such as Docker). Prefect uses the
pg_trgmextension, so it must be installed and enabled.
Using the database
A local SQLite database is the default database and is configured upon Prefect installation. The database is located at ~/.prefect/prefect.db by default.
To reset your database, run the CLI command:
prefect server database reset -y
This command will clear all data and reapply the schema.
Database settings
Prefect provides several settings for configuring the database. Here are the default settings:
PREFECT_API_DATABASE_CONNECTION_URL='sqlite+aiosqlite:///${PREFECT_HOME}/prefect.db'
PREFECT_API_DATABASE_ECHO='False'
PREFECT_API_DATABASE_MIGRATE_ON_START='True'
PREFECT_API_DATABASE_PASSWORD='None'
You can save a setting to your active Prefect profile with prefect config set.
Configuring a PostgreSQL database
To connect Prefect to a PostgreSQL database, you can set the following environment variable:
prefect config set PREFECT_API_DATABASE_CONNECTION_URL="postgresql+asyncpg://postgres:yourTopSecretPassword@localhost:5432/prefect"
The above environment variable assumes that:
- You have a username called
postgres - Your password is set to
yourTopSecretPassword - Your database runs on the same host as the Prefect server instance,
localhost - You use the default PostgreSQL port
5432 - Your PostgreSQL instance has a database called
prefect
Quick start: configuring a PostgreSQL database with Docker
To quickly start a PostgreSQL instance that can be used as your Prefect database, use the following command, which will start a Docker container running PostgreSQL:
docker run -d --name prefect-postgres -v prefectdb:/var/lib/postgresql/data -p 5432:5432 -e POSTGRES_USER=postgres -e POSTGRES_PASSWORD=yourTopSecretPassword -e POSTGRES_DB=prefect postgres:latest
The above command:
- Pulls the latest version of the official
postgresDocker image, which is compatible with Prefect. - Starts a container with the name
prefect-postgres. - Creates a database
prefectwith a userpostgresandyourTopSecretPasswordpassword. - Mounts the PostgreSQL data to a Docker volume called
prefectdbto provide persistence if you ever have to restart or rebuild that container.
Then you'll want to run the command above to set your current Prefect Profile to the PostgreSQL database instance running in your Docker container.
prefect config set PREFECT_API_DATABASE_CONNECTION_URL="postgresql+asyncpg://postgres:yourTopSecretPassword@localhost:5432/prefect"
Confirming your PostgreSQL database configuration
Inspect your Prefect profile to confirm that the environment variable has been set properly:
prefect config view --show-sources
You should see output similar to the following:

PREFECT_PROFILE='my_profile'
PREFECT_API_DATABASE_CONNECTION_URL='********' (from profile)
PREFECT_API_URL='http://127.0.0.1:4200/api' (from profile)
Start the Prefect server and it should begin to use your PostgreSQL database instance:
prefect server start
In-memory database
One of the benefits of SQLite is in-memory database support.
To use an in-memory SQLite database, set the following environment variable:
prefect config set PREFECT_API_DATABASE_CONNECTION_URL="sqlite+aiosqlite:///file::memory:?cache=shared&uri=true&check_same_thread=false"
Use SQLite database for testing only
SQLite is only supported by Prefect for testing purposes and is not compatible with multiprocessing.
Migrations
Prefect uses Alembic to manage database migrations. Alembic is a database migration tool for usage with the SQLAlchemy Database Toolkit for Python. Alembic provides a framework for generating and applying schema changes to a database.
To apply migrations to your database you can run the following commands:
To upgrade:
prefect server database upgrade -y
To downgrade:
prefect server database downgrade -y
You can use the -r flag to specify a specific migration version to upgrade or downgrade to.
For example, to downgrade to the previous migration version you can run:
prefect server database downgrade -y -r -1
or to downgrade to a specific revision:
prefect server database downgrade -y -r d20618ce678e
To downgrade all migrations, use the base revision.
See the contributing docs for information on how to create new database migrations.
Notifications
When you use Prefect Cloud you gain access to a hosted platform with Workspace & User controls, Events, and Automations. Prefect Cloud has an option for automation notifications. The more limited Notifications option is provided for the self-hosted Prefect server.
Notifications enable you to set up alerts that are sent when a flow enters any state you specify. When your flow and task runs changes state, Prefect notes the state change and checks whether the new state matches any notification policies. If it does, a new notification is queued.
Prefect supports sending notifications via:
- Slack message to a channel
- Microsoft Teams message to a channel
- Opsgenie to alerts
- PagerDuty to alerts
- Twilio to phone numbers
- Email (requires your own server)
Notifications in Prefect Cloud
Prefect Cloud uses the robust Automations interface to enable notifications related to flow run state changes and work pool status.
Configure notifications
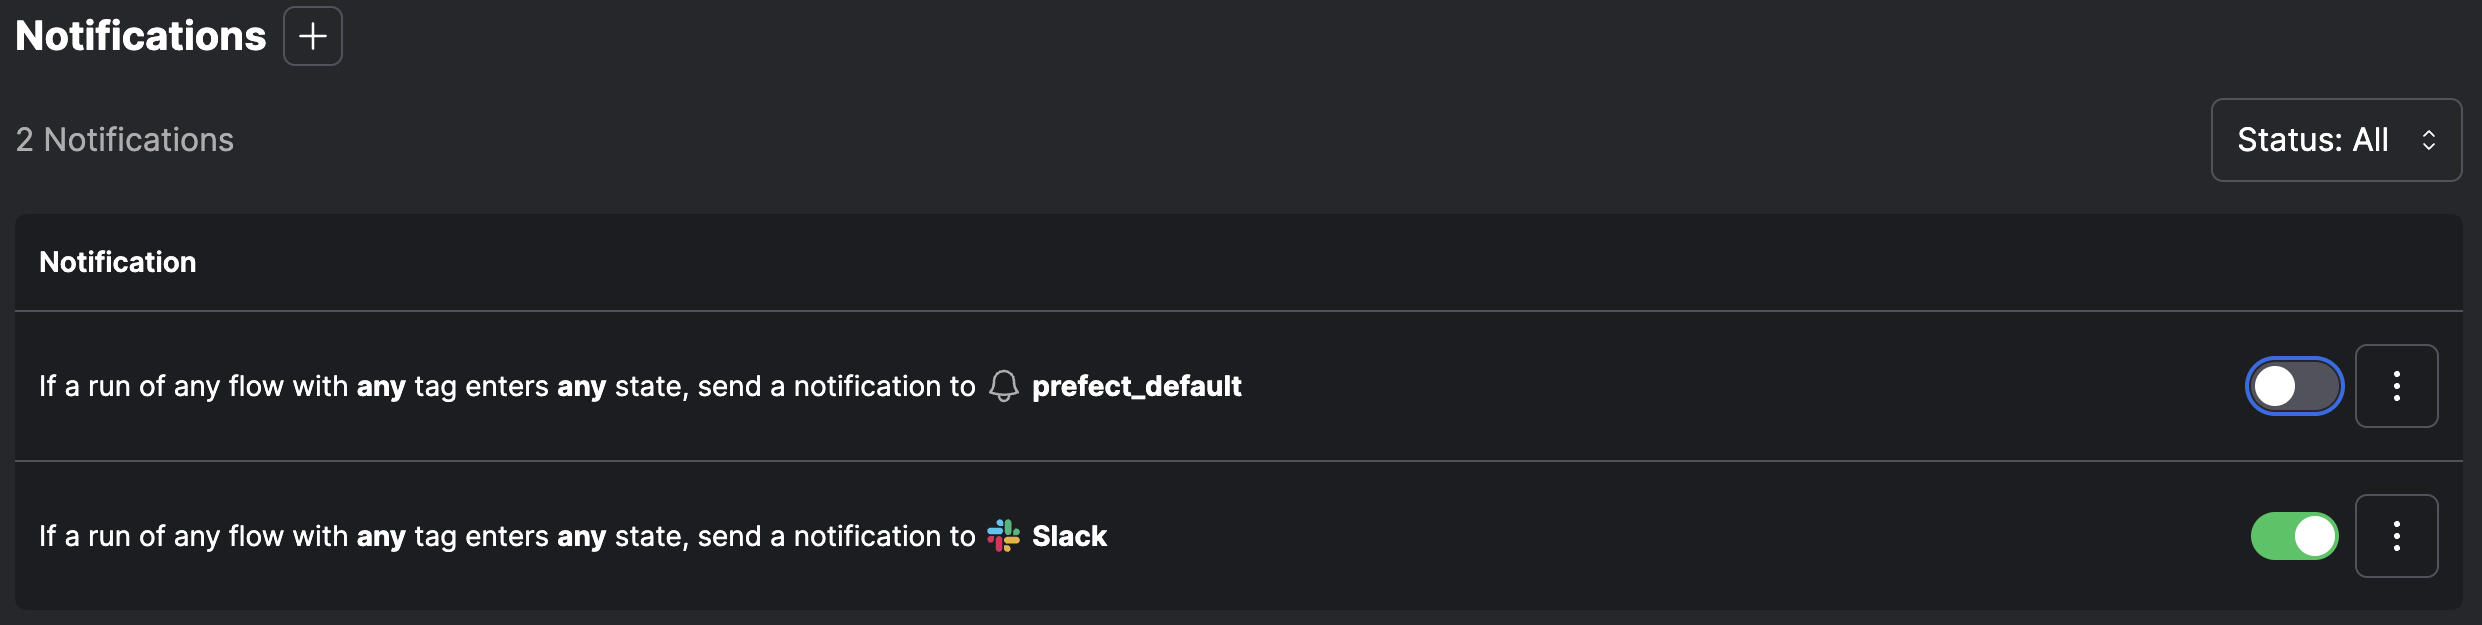
To configure a notification in a Prefect server, go to the Notifications page and select Create Notification or the + button.
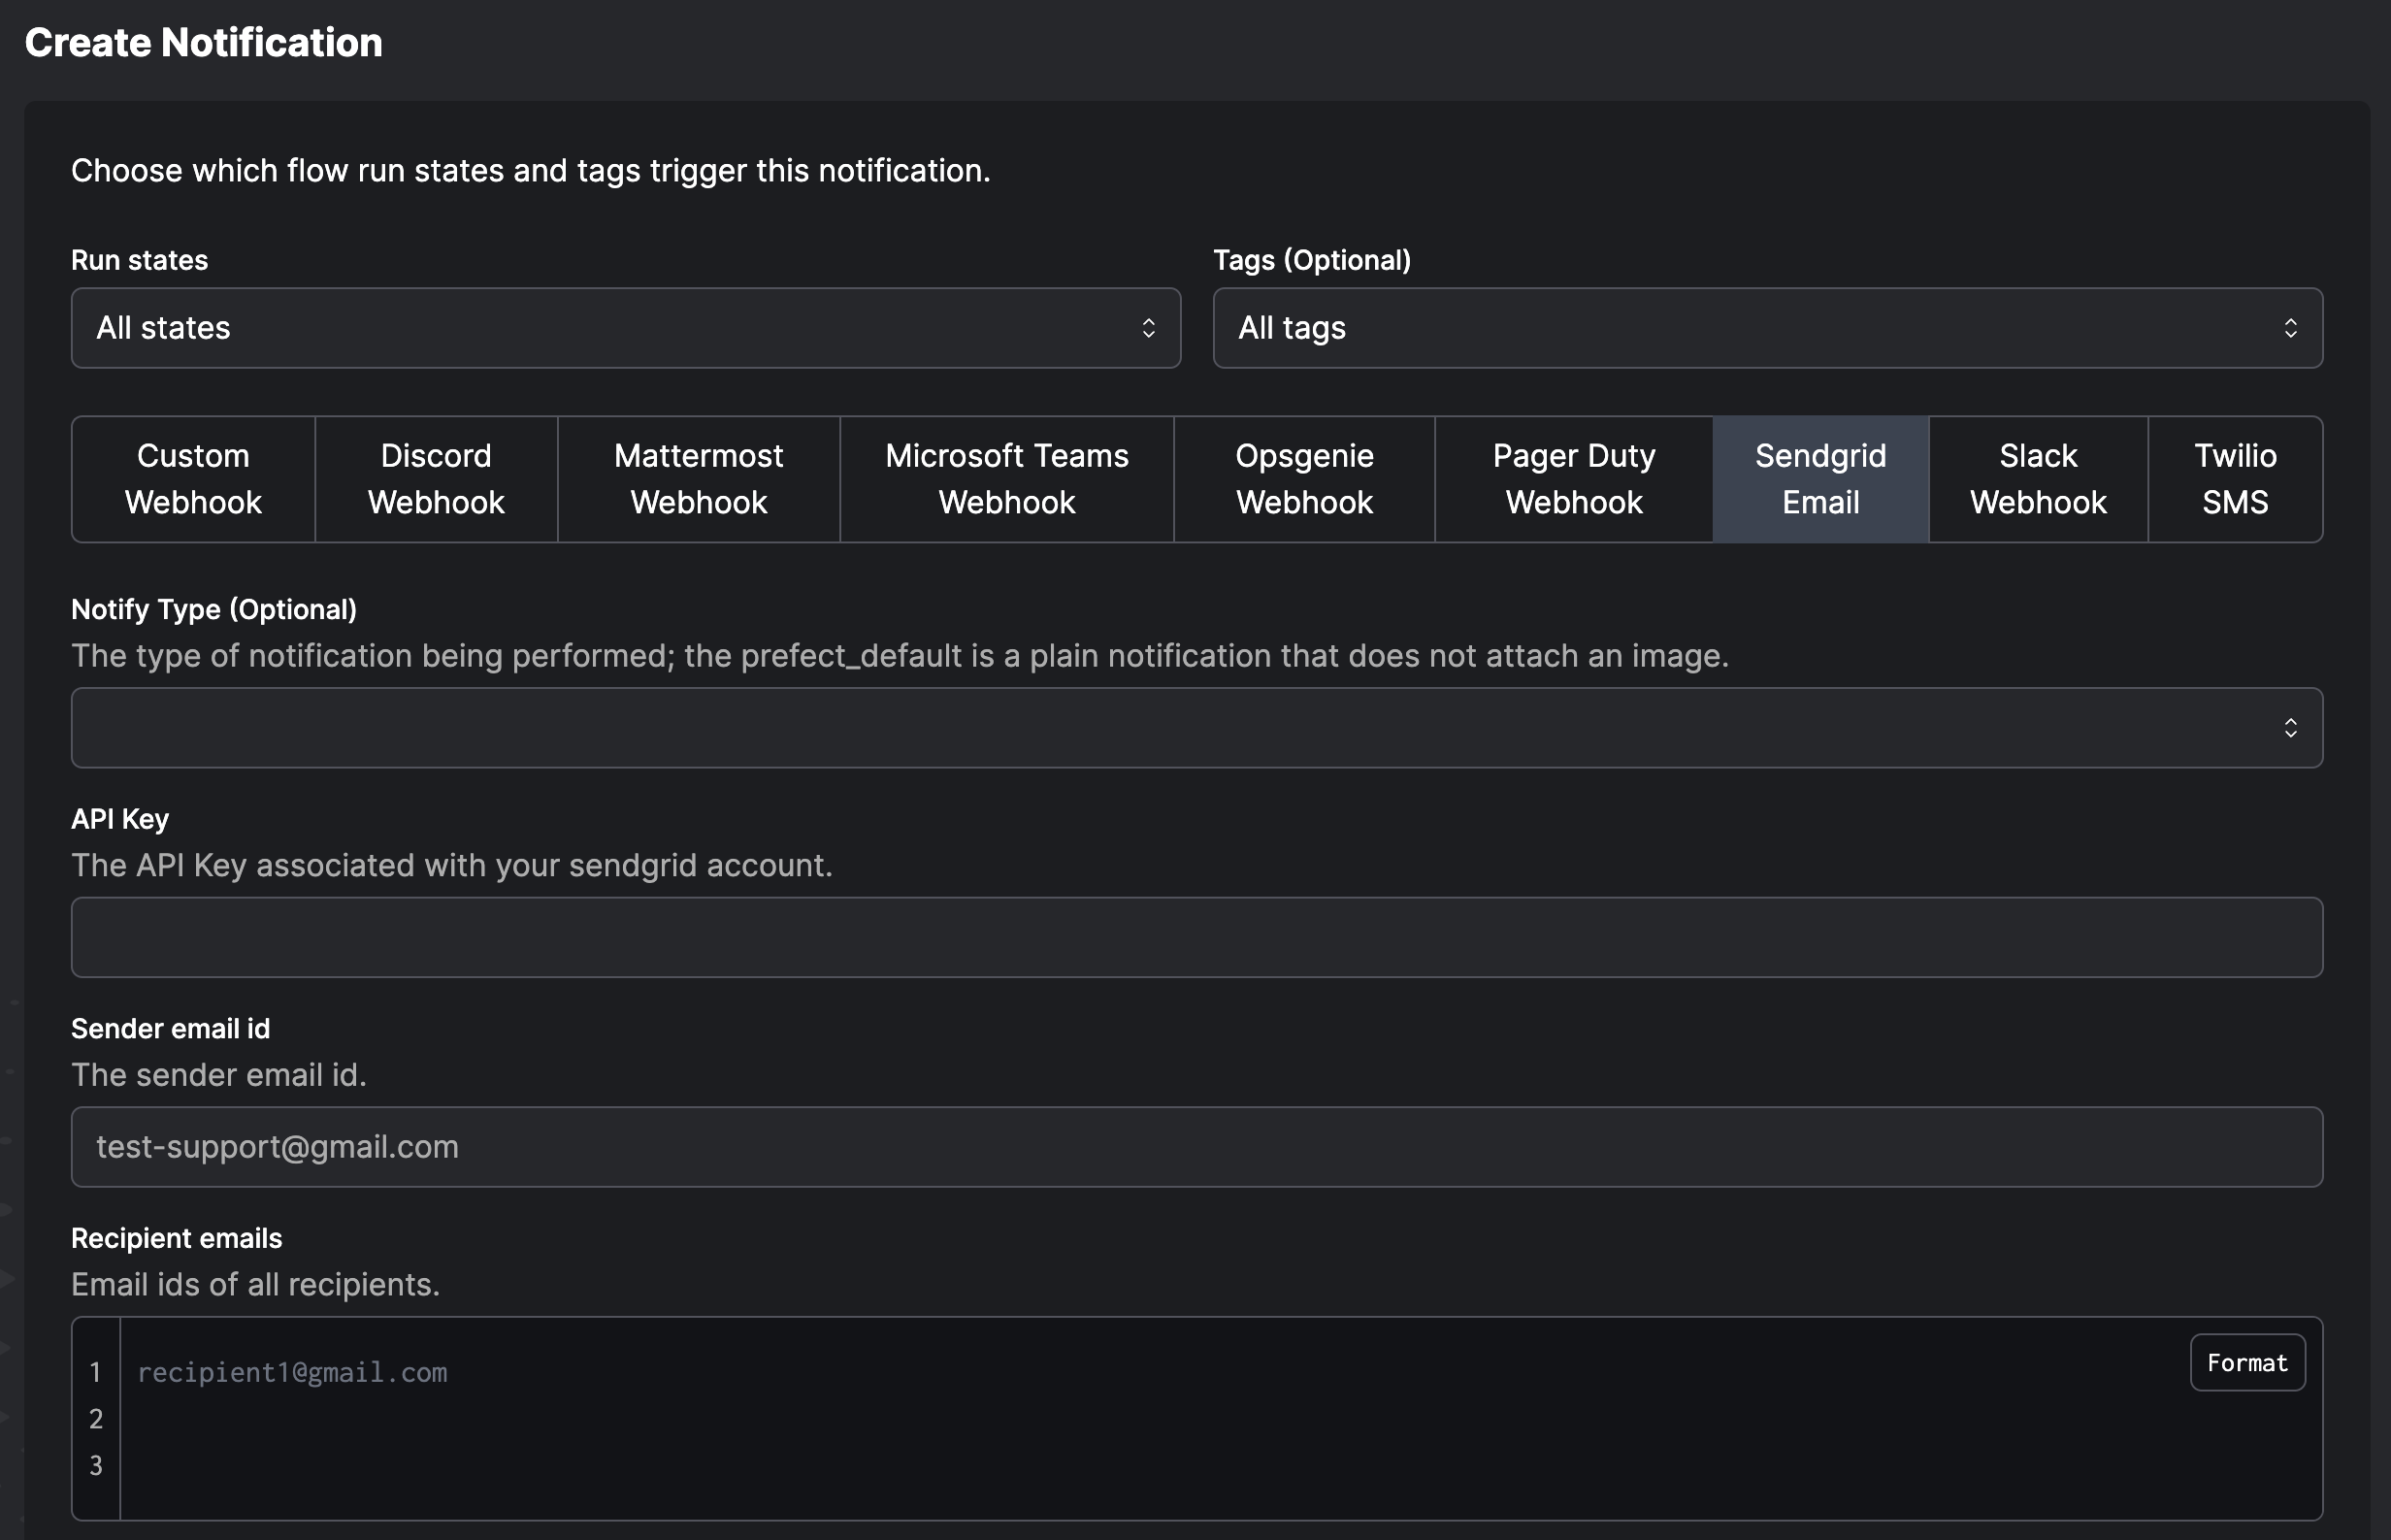
Notifications are structured just as you would describe them to someone. You can choose:
- Which run states should trigger a notification.
- Tags to filter which flow runs are covered by the notification.
- Whether to send an email, a Slack message, Microsoft Teams message, or other services.
For email notifications (supported on Prefect Cloud only), the configuration requires email addresses to which the message is sent.
For Slack notifications, the configuration requires webhook credentials for your Slack and the channel to which the message is sent.
For example, to get a Slack message if a flow with a daily-etl tag fails, the notification will read:
If a run of any flow with daily-etl tag enters a failed state, send a notification to my-slack-webhook
When the conditions of the notification are triggered, you’ll receive a message:
The fuzzy-leopard run of the daily-etl flow entered a failed state at 22-06-27 16:21:37 EST.
On the Notifications page you can pause, edit, or delete any configured notification.